
Cursive Alphabet A to Z
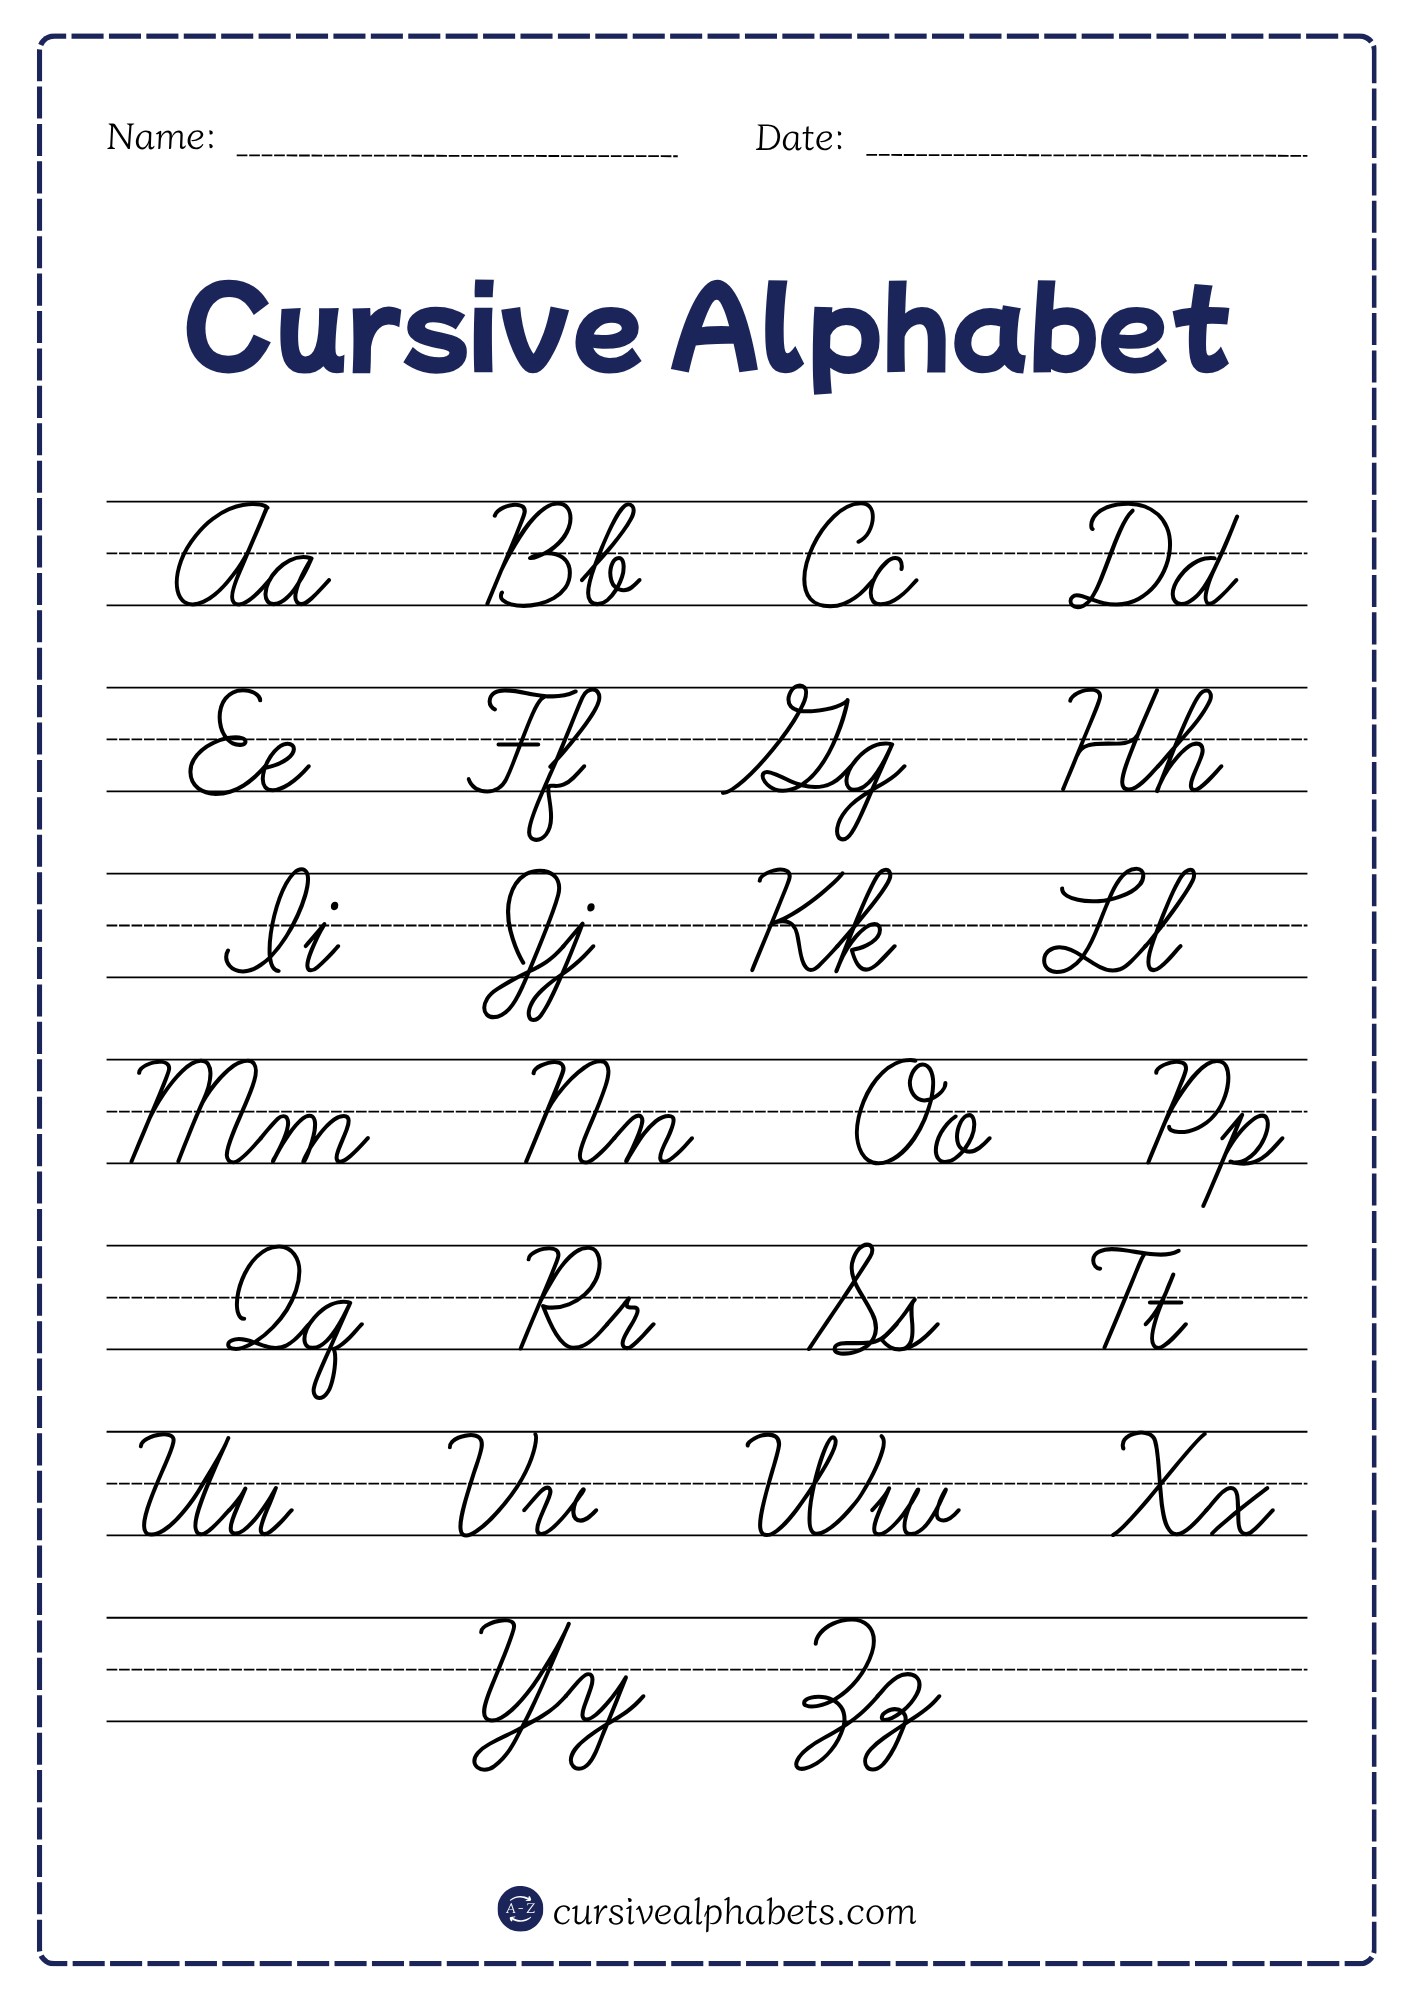
The cursive alphabet includes 26 letters from A to Z, written in a smooth, connected style. Download and practice uppercase and lowercase letters with free printable cursive alphabet A to Z worksheets. Whether you are a child, parent, teacher, or beginner, these cursive worksheets help you practice letter formation and improve your cursive handwriting.
What Is the Cursive Alphabet?
The cursive alphabet includes 26 letters from A to Z, written in a flowing handwriting style. Unlike print letters, cursive letters often use curves, loops, and connecting strokes to help letters flow naturally within words. The cursive alphabet includes uppercase (capital) and lowercase letters a to z, each with its own shape and writing pattern.
Learning the cursive alphabet helps you form letters correctly, maintain even spacing, and connect letters smoothly. Free printable cursive alphabet worksheets help you trace uppercase and lowercase letters and practice proper letter formation. With regular practice, you can develop neater, more consistent handwriting and feel confident writing cursive words and sentences.
How to Write Alphabet in Cursive?
-
Practice Basic Cursive Strokes
Start with simple curves, loops, and upstrokes that appear in many cursive letters. Practice these movements slowly to improve pencil control and learn how to form letters consistently.
-
Learn Lowercase Cursive Letters
Begin with lowercase cursive letters because they appear most often in everyday writing. Practice letters with similar shapes, such as i, u, w, and t, before moving on to more complex forms. Focus on letter size, shape, and starting strokes.
-
Practice Uppercase Cursive Letters
Next, learn uppercase cursive letters from A to Z. Pay attention to the unique shapes and strokes of each capital letter. Practice writing them neatly, especially when forming names and starting sentences.
-
Learn to Join Cursive Letters
Once you can form individual letters, practice connecting them to create smooth, readable words. Start with simple letter combinations, such as th, st, and ch. Keep your spacing even and follow the correct connecting strokes for each letter.
-
Write Cursive Words and Sentences
Practice short, familiar words before moving on to complete sentences. This helps you apply letter connections, maintain consistent spacing, and develop a natural writing rhythm.
-
Use Printable Cursive Worksheets
Free printable cursive alphabet worksheets provide letter examples and tracing practice for uppercase and lowercase letters. Download and print them to practice at your own pace. Regular practice helps you improve letter formation, handwriting consistency, and confidence.
-
Practice a Little Every Day
Set aside a few minutes each day to write cursive letters, words, and sentences. Start slowly and focus on accuracy before increasing your speed. With consistent practice, your cursive handwriting can become smoother, clearer, and more natural.
Free Printable Cursive Worksheets
Practice cursive handwriting with free printable worksheets for every stage of learning. From individual letters to complete paragraphs, these worksheets help you improve letter formation, connections, spacing, and writing fluency.
Learn uppercase and lowercase cursive letters A to Z with free printable cursive alphabet worksheets. Practice letter formation and tracing to build a strong foundation in cursive handwriting.
Practice connecting cursive letters with printable cursive joining letters worksheets. Learn smooth letter transitions, correct connecting strokes, and even spacing to write words more naturally.
Improve your cursive handwriting with printable cursive words worksheets. Practice common words, smooth letter connections, and consistent letter shapes to develop better writing flow.
Build your handwriting skills with free printable cursive sentence worksheets. Practice complete sentences to improve letter connections, word spacing, and writing fluency.
Develop fluent cursive handwriting with printable cursive paragraph worksheets. Practice longer passages to improve writing rhythm, consistent spacing, and readability from start to finish.
Tips for Improving Cursive Handwriting
Improving cursive handwriting takes regular practice and attention to detail. Focus on letter formation, smooth connections, and consistent spacing before trying to write faster. Follow these practical steps to make your cursive writing neater and easier to read.
- Practice basic strokes: Write rows of under-curves, over-curves, loops, and connecting strokes to improve pencil control and prepare for forming cursive letters.
- Trace uppercase and lowercase letters: Use printable cursive alphabet worksheets to follow each letter's shape and stroke direction before writing it independently.
- Group letters by similar shapes: Practice letters with similar strokes together, such as i, u, w, and t. This helps you learn common movements and improve consistency.
- Work on letter size and slant: Write several rows of the same letter, keeping its height and angle consistent. Use lined paper to guide tall letters, small letters, and letters that extend below the baseline.
- Practice joining letter pairs: Write combinations such as th, ch, sh, and st. Pay attention to the exit stroke of the first letter and the entry stroke of the next.
- Copy short, familiar words: Practice words such as cat, home, little, and school. Focus on smooth connections, clear letter shapes, and even spacing.
- Write complete sentences: Copy a short sentence several times, checking the spacing between words, the size of letters, and the overall flow of your handwriting.
- Practice short paragraphs: Once you feel comfortable writing sentences, copy a few lines from a book or worksheet. Aim for consistent letter formation and readable writing throughout.
- Repeat difficult letters: Identify letters that look uneven or are hard to connect, then practice them separately before using them in words.
- Build speed gradually: Begin with slow, careful writing. As your movements become more familiar, increase your pace without sacrificing legibility.
A Simple Daily Cursive Practice Routine
2 minutes: Warm up with basic curves, loops, and connecting strokes.
3 minutes: Practice uppercase or lowercase cursive letters.
3 minutes: Join letters and write short words.
5 minutes: Copy sentences or a short paragraph.
2 minutes: Review your writing and repeat any letters or connections that need improvement.
Common Cursive Handwriting Mistakes to Avoid
Improving cursive handwriting takes regular practice and attention to detail. Focus on letter formation, smooth connections, and consistent spacing before trying to write faster. Follow these practical steps to make your cursive writing neater and easier to read.
- Inconsistent Letter Size: Mixing tall and short letters makes handwriting look uneven.
- Incorrect Letter Formation: Forming cursive letters with the wrong strokes can make them difficult to recognize.
- Uneven Slant: Changing the angle of letters throughout a word reduces consistency.
- Poor Letter Connections: Incorrect joins or unnecessary pen lifts interrupt the natural flow of cursive writing.
- Uneven Spacing: Crowded letters or large gaps between words make writing harder to read.
- Writing Too Quickly: Increasing speed before mastering letter formation can lead to messy handwriting.
- Incorrect Pencil Grip: Holding the pencil too tightly can reduce control and cause hand fatigue.
- Skipping Regular Practice: Infrequent practice makes it harder to develop consistent writing habits.
Frequently Asked Questions
The cursive alphabet is the set of 26 letters from A to Z written in a flowing handwriting style. It includes uppercase and lowercase letters, which often use curves and connecting strokes to form words smoothly.
Start by practicing basic cursive strokes, then learn each uppercase and lowercase letter individually. Focus on each letter’s shape and stroke direction before practicing connections, words, and sentences. Printable cursive alphabet worksheets can help you trace and practice all 26 letters.
It is usually helpful to start with lowercase cursive letters because they appear more often in everyday writing and are commonly connected within words. Once you feel comfortable forming them, practice uppercase cursive letters used for names, proper nouns, and the beginnings of sentences.
Print letters are generally written separately, while cursive letters are designed to flow from one letter to the next within a word. Cursive often uses connecting strokes and loops, whereas print writing usually has more distinct spaces between individual letters.
Practice regularly and focus on clear letter formation before increasing speed. Use lined paper to maintain consistent letter height, slant, and spacing. Printable cursive worksheets can help you work on individual letters, joining strokes, words, and sentences while tracking your progress.
Yes, adults can learn cursive handwriting at any age. Start with basic strokes and individual letters, then progress to connecting letters, words, and sentences. Printable cursive worksheets provide structured practice for beginners who want to develop more fluent handwriting.
After learning uppercase and lowercase cursive letters, practice joining letters to form words. Then move on to sentences and paragraphs to improve spacing, rhythm, and writing fluency. Printable cursive joining letters, words, sentences, and paragraph worksheets can guide you through each stage.